We recently upgraded our podcast setup at Get Paid (the podcast for our company Paid) and I learned a ton about what actually matters for quality.
Our goal was simple: select the best podcast equipment for a professional studio, without breaking the bank
I needed system that works for both remote and in-person interviews without technical headaches
I don’t think I achieved the “no technical headaches” part too well, but it works 🤷♂️
Note: This equipment list was last updated in May 2025
Summary of everything
| Equipment type | What I chose | Pros | Cons | Budget alternative |
|---|---|---|---|---|
| Video camera | Blackmagic Micro Studio Camera 4K G2 + Fixed prime cinema lenses | Cinema-quality footage Flexible MFT mount Compact size | Manual focus A bit of a learning curve | Sony ZV-E10 |
| Audio | Shure MV7+ Audiotechnica ATH-M30x | Dual XLR/USB Can be used as a computer mic Good directionality | Requires careful positioning Needs an arm or mount | Røde PodMic |
| Audio and video interface | RØDECaster Video | All in one solution Great selection of inputs and outputs | Expensive | Atem Mini |
| Lighting | Godox SL60II-D + Ambitful RGB Accents | Needs lots of space No instructions included | Cheap USB lights | |
| Teleprompter | Elgato Prompter | Simple setup Easy to use | Not necessary for everyone | Tablet + cheap basic prompter |
| Storage | Samsung T7 SSD | Fast Reliable | Nothing else I tested worked well | |
| Organization | Flyht Pro Case | Organized transport Looks professional Easy to setup | Heavy! | Pelican-style case or desk |
| Tripods and mounts | Heavy-duty photo tripods | Stable Smooth panning and tilting Adjustable height | Bulky to transport | Desktop tripods and mounts |
🏢 The location
We have a little office in London, but we agreed we’d close off part of it for the podcasting area.
Don’t overlook comfort!
- A comfortable sofa and chair
- Thick rug (also absorbs sound)
- Movable walls for sound isolation
Comfortable guests give better interviews. This directly impacts content quality regardless of your tech.
This is the layout I’ve selected – sofa, lounge-chair, a coffee table, and a thick carpet.

I originally wanted some curtains around the back, but I decided it wasn’t worth it.
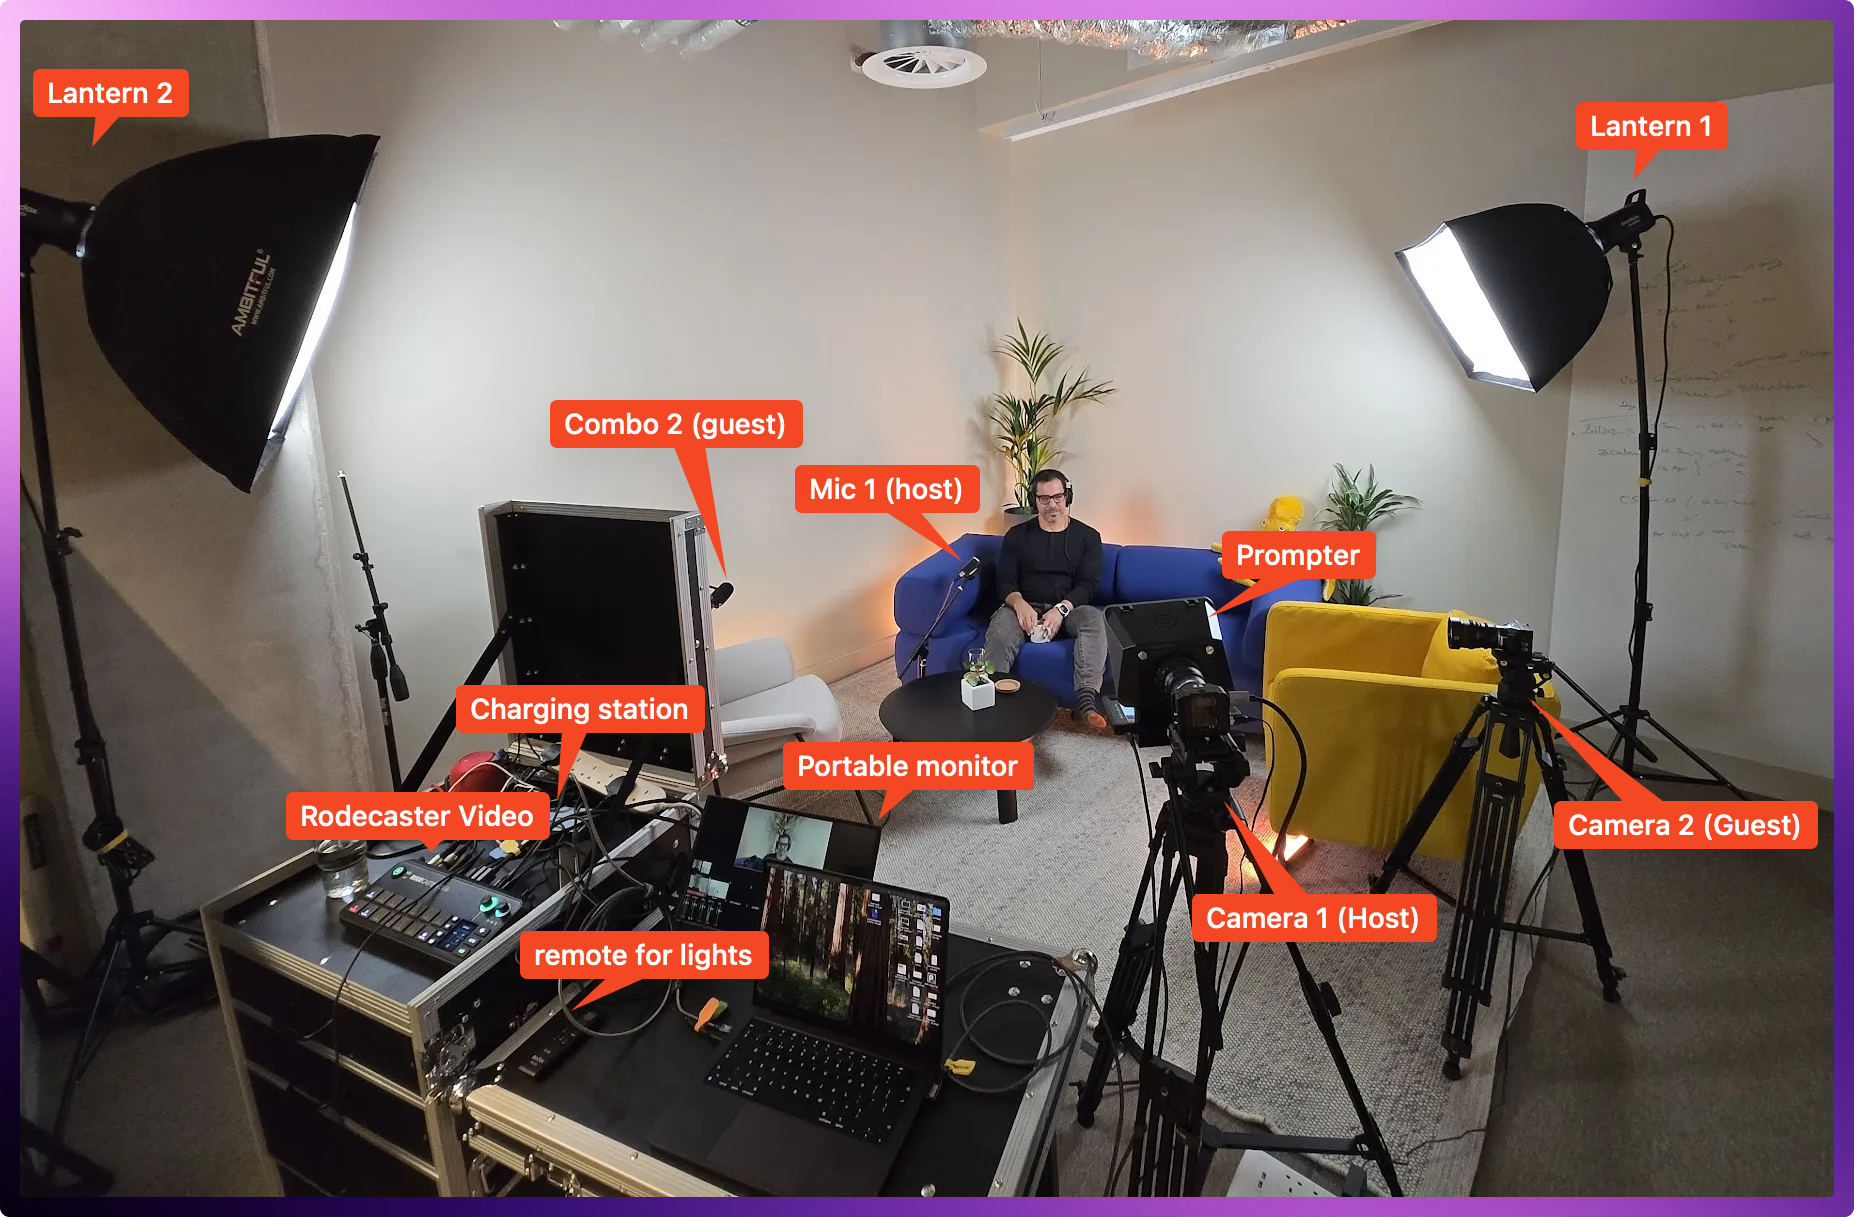
Our almost final studio layout looks like this. We can host either both guest and host in-person, or have a remote episode with only the host in the studio.

📦 Organization & Storage
I keep everything semi-mobile and organized in a Flyht Pro Case Production.
This case has been a lifesaver – it keeps cables, adapters, and smaller equipment protected and organized.

🎥 Camera System
I chose Blackmagic Micro Studio Camera 4K G2 cameras because they looked small and they are relatively cheap for a broadcast quality camera.

- Lightweight but professional-grade
- Battery backup options (saves recordings when power flickers or if I need to move them)
- MFT mount for flexible lens options
I also considered the similarly priced Blackmagic Design Pocket Cinema Camera 4K. I may still get one of those for more “on the go” in the future, as it does have a screen.
For lenses, we went with manual focus Meike cinema lenses (25mm & 35mm T2.2) rather than autofocus.


Why? In a controlled studio environment, autofocus constantly hunts during tiny movements. Manual focus just works better once it’s set.
We mount these on sturdy Cayer BV30L Video Tripod System. They’re a bit overkill for the size of the camera, but they give a nice feeling!

A side-effect is that I have to re-do the focus every time, as the cleaners that come at night keep moving my tripods 🫠
🔊 Audio Setup
Audio is the foundation of any podcast. We use Shure MV7+ microphones.

We believe they:
- Deliver clean vocals even in relatively untreated rooms like ours
- Offer both XLR and USB connectivity
- Are quite directional
- Stand up to professional broadcast standards
One lesson learned: Don’t skimp on XLR cables. Cheap cables keep crackling and breaking. Get a few extras so you don’t end up with a crackly cable at the last moment.
For mic positioning, we use adjustable boom arms:
(get a couple)

We also have a couple of table-mounted: FIFINE Microphone Boom Arm, but we don’t use them very frequently.
For headphones, we use the Audio-Technica ATH-M30x. They look good, and they sound good.

🎮 Control Center
The RØDECaster Video serves as our central hub:

- Handles audio mixing with high-quality preamps
- Manages multiple video inputs
- Provides complete recording control
- Allows for sound effects and transitions
This single device has auto-switching, and can function almost standalone.
I often record to a Samsung T7 SSD (other drives seem to fail mid-way through a recording)

I also got a monitor that I can fold down easily into the case

📜 Teleprompter
I decided to get an Elgato Prompter to make remote podcasts easier.
Being able to look your guest in the eye was a great investment.

💡 Lighting
I’m not a lighting expert, so this was a weird purchase, but our lighting combines key lights with soft boxes and smaller RGB accent light sticks around:\
I got a 2-pack of Godox lights with softbox and C-stands. It came with no instructions, so it was fun trying to figure out how to build the softboxes.

For accent lighting and flexibility, we use the Ambitful light sticks in small and large sizes
AMBITFUL A2 Full-Color RGB Tube Light:

The bigger AMBITFUL A2PRO also works well:

Proper lighting makes even modest cameras look professional, and these RGB lights let us add depth and visual interest to the frame.
📦 Organization and cables
You also want a bunch of:
- High quality HDMI cables (like these HDMI cables from UGREEN) in various lengths, so that you can tape them down and out of the way
- High quality Thunderbolt USB-C cables in various lengths
- As mentioned, a bunch of extra XLR cables
The last thing you want is to have everything ready and discover you’re missing a few inches because you didn’t get a long enough cable.
For us, everything outside the lights fits in a Flyht production case with:
- Cable labels
- Cable ties (including this Tesa cable wrap which helps keep things looking neat)
- Charging station (I like the Anker Prime Charger 200W)
- Backup cables for inevitable failures

This organization system prevents troubleshooting headaches and reduces setup time.
💰 Cost Perspective
I tried to stay within the $10,000 budget I set myself. Our setup cost around £7,000 (~$9300) which is pretty good!
This might seem steep, but consider:
- Cost per episode decreases dramatically over time
- Professional quality attracts better guests
- Higher production values increase engagement
- Equipment lasts for years with proper care
The best podcast equipment creates a system where technology disappears, letting the conversation become the focus.
Our setup lets us concentrate entirely on the guest and content.
The checklist
- Camera System
- 2x Blackmagic Micro Studio Camera 4K G2
- Manual focus cinema lenses (25mm & 35mm)
- Heavy-duty tripods
- HDMI cables (high quality like UGREEN)
- Audio Recording
- 2x Shure MV7+ microphones
- RØDECaster Video interface
- XLR cables
- Adjustable mic boom arms
- Headphones for monitoring
- Lighting Setup
- Main key lights with softboxes
- RGB accent lights for background
- Charging station for battery-powered lights
- Storage & Recording
- Samsung T7 SSD for local recording
- Backup drive so you’re not stuck without one
- External USB-C/HDMI monitor for preview
- Infrastructure & Organization
- Flyht Pro Case for transport
- Cable management system (labels, ties)
- Power strips with surge protection
- Backup cables for essential connections
- Environment & Comfort
- Comfortable seating for host and guest
- Sound-absorbing materials (rug, panels)
- Movable walls for customizing space
- Teleprompter for staying on topic
- Connectivity
- Thunderbolt 3/4 USB-C cables
- HDMI cables in various lengths
- Headphone extension cables
- Backup power options
Leave a Reply